
Last updated: May 6, 2024
You can associate assets with business units to keep your assets organized by brand. After setting up your business units, you can associate assets such as brand domains, forms, pages, and more.
To learn how to associate records with business units, click here.
When associating your assets with business units, please note the following:
- If you want to associate the business unit with a brand domain, make sure that the brand domain is connected before setting up business units.
- Campaigns, emails, and forms can only be associated with business units when created. While all other assets can be reassigned, it isn't possible to reassign an email or form once created.
Please note: you may need to manually opt-in to access certain tools related to business units, such as marketing emails and subscription types. If you don't have access to a specific feature outlined below but would like to, reach out to your Customer Success Manager.
Ad accounts
After setting up business units and connecting your ad accounts, you can associate each ad account with a different business unit. To associate an ad account with a specific business unit:
- In your HubSpot account, click the settings icon in the top navigation bar.
- In the left sidebar menu, navigate to Marketing > Ads.
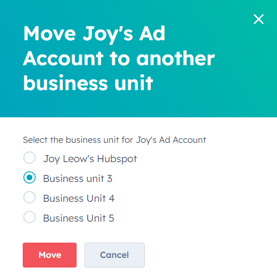
- Hover over the ad account and click Actions. Then, select Move to another business unit.
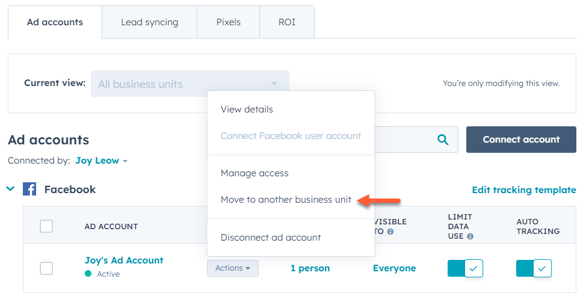
- In the dialog box, select a new business unit.
- At the bottom, click Move. The ad account will be moved to the selected business unit.
Brand domain
When adding a new brand domain, it's automatically associated with the default account business unit. This domain can be associated with another business unit after. All subdomains under that brand domain will also be associated with the same business unit.
To associate a brand domain with a different business unit:
- In your HubSpot account, click the settings icon in the top navigation bar.
- In the left sidebar menu, navigate to Content > Domains & URLs.
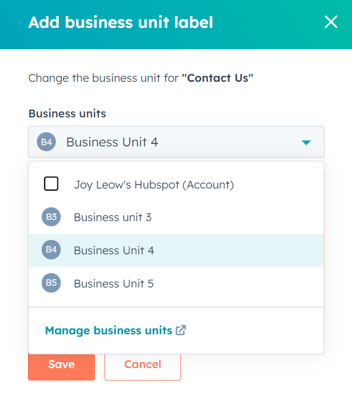
- In the Brand domains section, next to a brand domain, click Edit. Then select Change business unit.
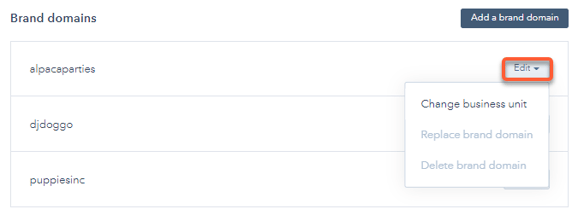
- In the dialog box, click the Business unit dropdown menu and select a business unit.
- Click Change. The brand domain business unit will be updated.
- To review the subdomains associated with each business unit:
- In your HubSpot account, click the settings icon in the top navigation bar.
- In the left sidebar menu, navigate to Business Units.
- From the Current view dropdown menu, click the business unit that you want to review.
-
- Click the Website tab.
- Under the Domains & URLs section, review the brand domains associated with the selected business unit.
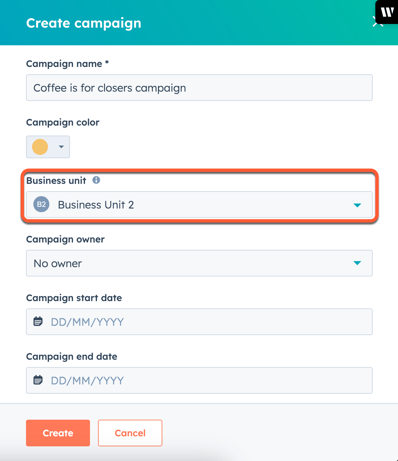
Campaigns
When creating a new campaign, you can associate the campaign with a business unit. Existing campaigns will stay associated with the account's default business unit. Once a campaign is created, you can't change the associated business unit. Instead, you can clone the campaign and update the associated business unit in the cloned campaign.
To associate a campaign with a business unit:
- In your HubSpot account, navigate to Marketing > Campaigns.
- In the top right, click Create campaign.
- Choose Start from scratch or Start from template, then click Next.
- While filling in your campaign details, click the Business unit dropdown menu, then select the business unit you want to associate with the campaign.
- After creating your campaign, review and associate assets from the same business unit. Some assets can't be associated with business units. Learn more about associating your assets with business units.
Click tracking domain (BETA)
Please note: if you're a super admin, learn how you can opt your HubSpot account into beta features.
You can also customize the click-tracking domain used in marketing emails for each business unit so links in your emails are consistent with each brand. By default, the click tracking domain will be your email sending domain.
To edit the click tracking domain:
- In your HubSpot account, click the settings icon in the top navigation bar.
- In the left sidebar menu, click Marketing > Email.
- Click the Tracking tab.
- In the Click tracking domain section, click Edit next to the business unit.
- Click the Domain dropdown menu, select a domain and then click Save.
![]()
Cookie policy
If you would like to create a separate cookie policy for each brand domain and customize brand colors for each banner, you can create a custom cookie policy for a business unit.
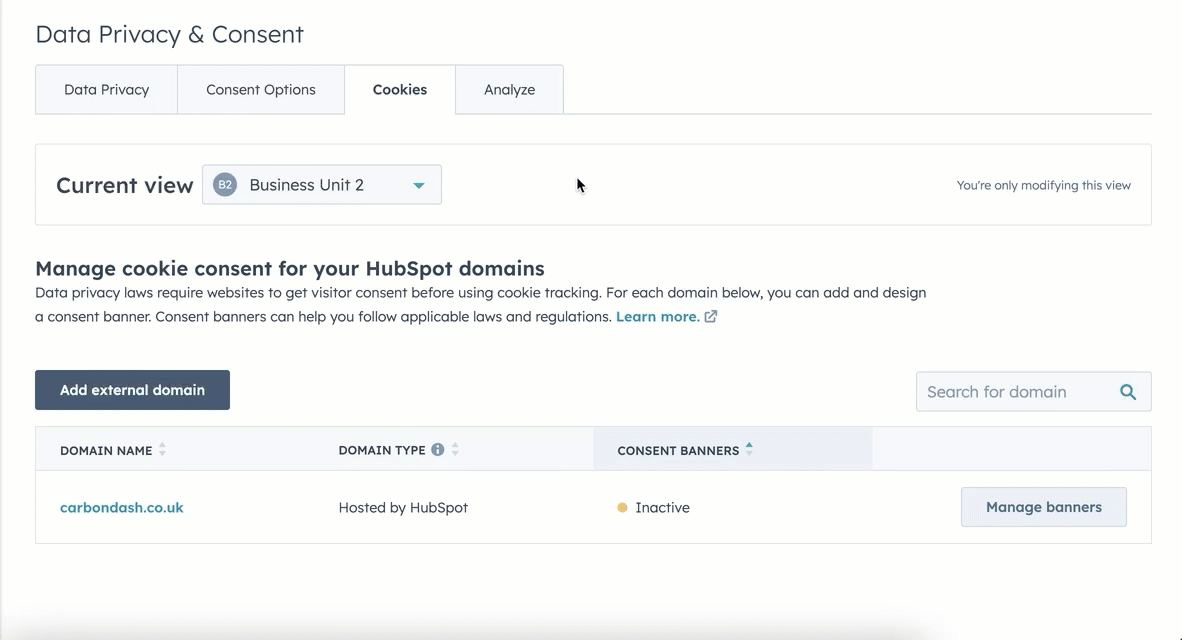
- In your HubSpot account, click the settings icon in the top navigation bar.
- In the left sidebar menu, navigate to Privacy & Consent.
- Click the Cookies tab.
- From the Current view dropdown menu, select a business unit.
-
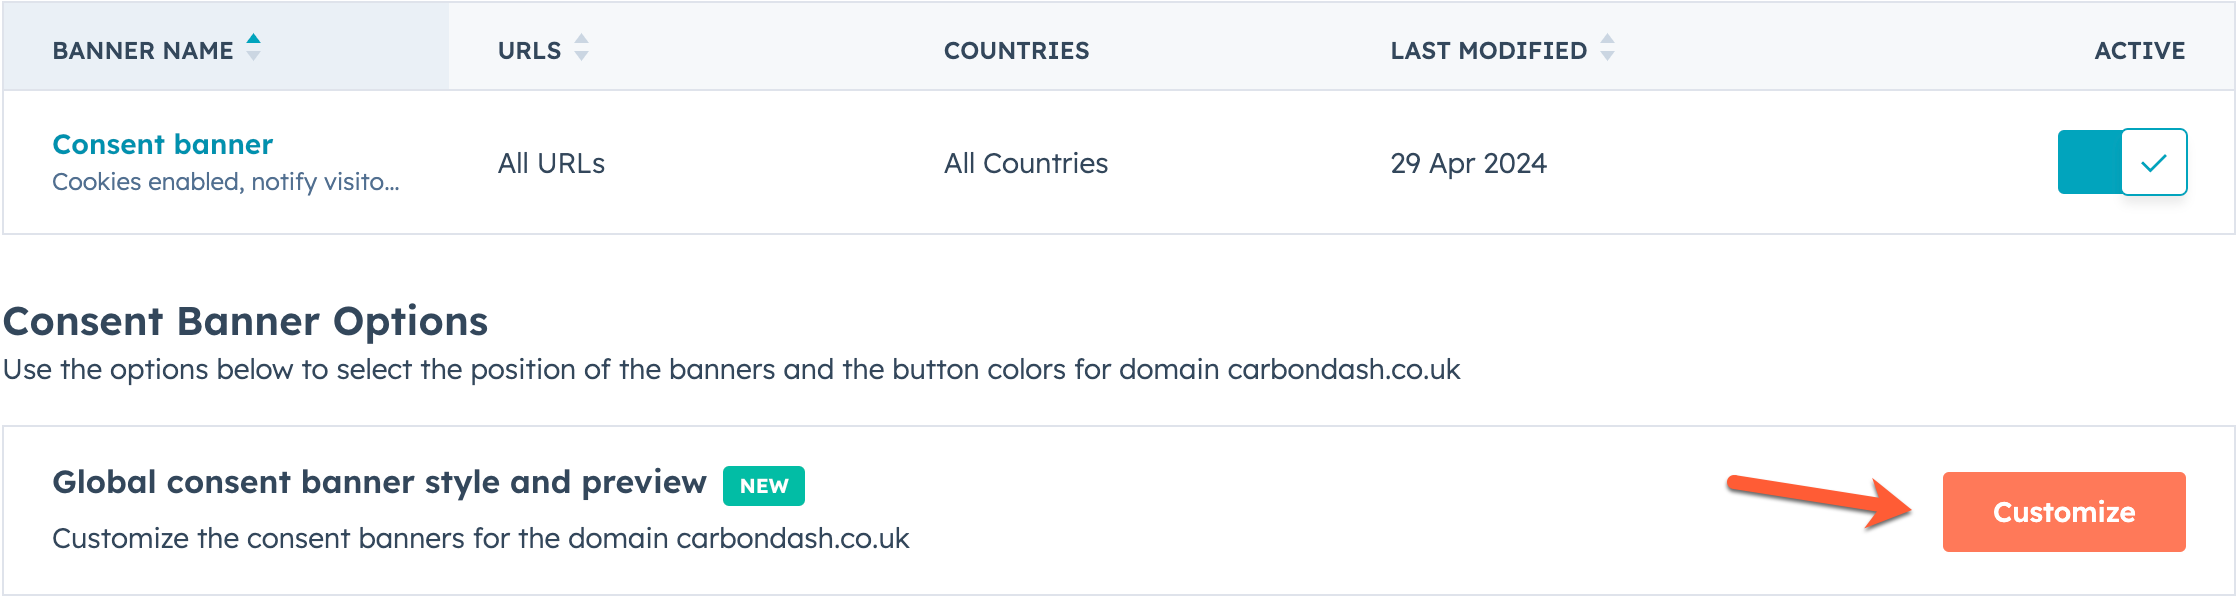
Click Manage banners next to the domain.
- Click Create consent banner.
- Add your consent banner details, then click Next.
- Choose a banner type, select the language, then click Publish.
- Under Consent Banner Options, click Customize to customize the style of the banner.
Custom properties
You can associate custom contact properties with a business unit. But, keep in mind that this custom contact property will be available for all contacts, not just the contacts associated with the business unit. To manage this, you can also create a conditional section on your record sidebar so the properties will only appear if there is a set value for the business unit property.
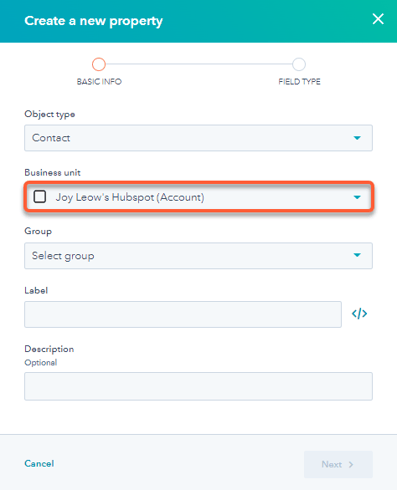
To associate custom contact, company, or deal properties with a business unit:
-
In your HubSpot account, click the settings icon in the top navigation bar.
-
In the left sidebar menu, navigate to Properties.
-
In the Select an object section, click the dropdown menu and select a property.
- In the upper right, click Create property.
- From the Business unit dropdown menu, select a business unit.
Forms
You can only associate a form with a business unit when creating the form. To change a form's business unit, you'll need to recreate the form. Non-HubSpot forms are automatically associated with the account's default business unit and can't be changed. After creating your form, you can filter your forms by business unit.
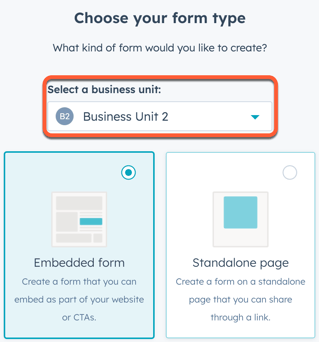
To associate a form with a business unit:
- In your HubSpot account, navigate to Marketing > Forms.
- In the upper right, click Create form.
- In the dialog box, click the Business unit dropdown menu and select the business unit.
- Continue creating your form.
Marketing emails (BETA)
Please note: if you're a super admin in your HubSpot account, you can opt your account into a beta feature you want to try out on the Product Updates page.
You can only associate an email with a business unit when creating the email. To change an email's business unit, you'll need to recreate the email. When you associate marketing emails with business units, you can filter your emails by business unit to review trends and export reports when analyzing your marketing email performance.
Please note: When sending test marketing emails, the test email's links will always display unsubscribe and preference information for the default account business unit. The selected business unit's information will only display in published and sent marketing emails.
To associate an email with a business unit:
- In your HubSpot account, navigate to Marketing > Marketing Email.
- Click Create email.
- In the dialog box, click the Business unit dropdown menu and select a business unit.
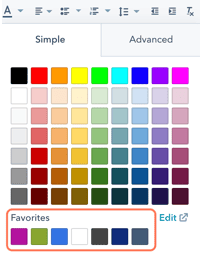
- Continue creating your email. The brand kit default colors will be displayed in the color picker favorites as you design your email.
You can also clone an existing email that you've already associated with one business unit to another business unit:
- In your HubSpot account, navigate to Marketing > Marketing Email.
- Hover over the email you want to clone, then click Clone.
- In the dialog box, click the Business unit dropdown menu and select a business unit.
- Enter a name for the cloned email.
- Click Clone.
Pages
When you create a page, a business unit will be associated with the page based on the page domain.
- To change the business unit associated with your page, change the domain set in the page's URL. Learn more about changing the URL for your pages.
- To view the different pages associated with your business unit:
-
Navigate to your content:
- In your HubSpot account, navigate to Content > Website Pages.
- In your HubSpot account, navigate to Content > Landing Pages.
-
-
- In the top right, click your profile picture, then hover over Business Unit.
- Select the business unit you want to navigate to.
Email subscriptions
You can customize a unique resubscription email for each of your business units, as well as opt into the beta for managing subscription types and statuses per business unit.
Resubscription email
You can create and customize a resubscription email that can tailored to the branding or guidelines of each business unit. Each resubscription email can be independently turned on or off.
To customize a resubscription email for a specific business unit, you'll first switch to the business unit you want to create the email for, then create the associated email:
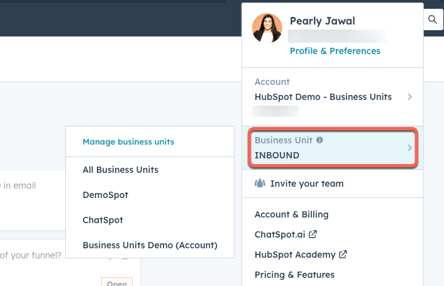
- Click your profile picture in the top right corner, hover over Business Units, then select a business unit.
- In your HubSpot account, click the settings icon in the top navigation bar.
- In the left sidebar, navigate to Marketing > Email.
- Click the Subscriptions tab.
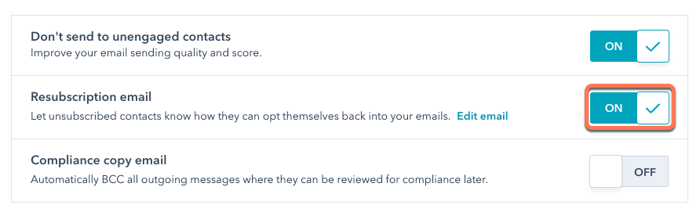
- Under Resubscription email, click Edit email.
- You'll be redirected to the email editor to design your resubscribe email, where you can edit the email details. This resubscription email has pre-populated text you can customize, but you must keep the Update your subscription preferences link.
- When you're finished designing your email, click Review and publish in the upper right.
- Click Publish to take the email live. Once published, you'll be redirected back to your email settings.
- Click to toggle the Resubscription email switch on, then click Save in the bottom left.
After you've published your resubscription email and toggled the Resubscription email switch on, contacts who unsubscribed to all your subscription types will be prompted with a link to receive your resubscription email when they enter their email address on one of your forms. Note that a contact must still click the link in your resubscription email to view available subscription types, then update and confirm their subscription preferences.
Please note: if you previously had the resubscription email setting toggled on, it will remain on for the default account business unit. You will need to configure and switch on resubscription emails for each individual business unit.
Subscription types (BETA)
Please note: if you're a super admin in your HubSpot account, you can opt your account into a beta feature you want to try out on the Product Updates page.
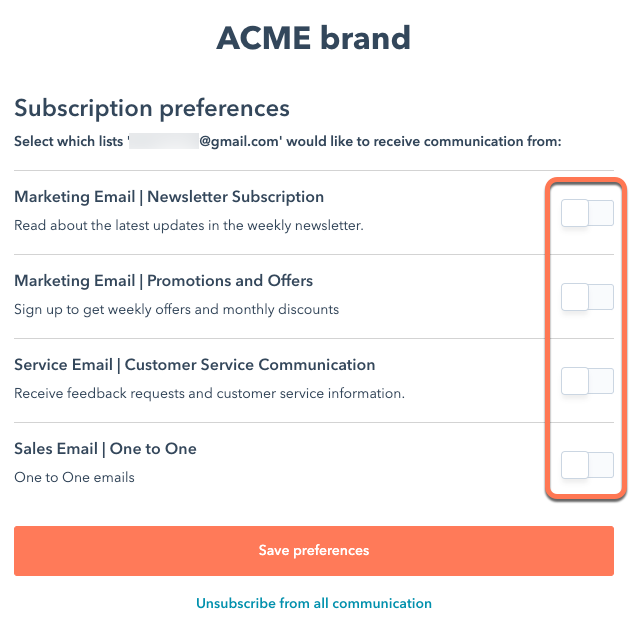
Associate and manage your email subscription types with different business units to allow contacts to unsubscribe from one business unit while remaining subscribed to others. When doing so, please note the following:
- Contacts who opt out of all email communication for a specific business unit will be opted out of all subscriptions for that business unit.
- The following default subscription types can't be associated with business units. These subscriptions will default to the main HubSpot account.
- One-to-one emails
- Customer service communication emails
- Transactional emails
- Contacts who are imported into an opt-out list, or manually opted out on a record will only be opted out of the Account business unit, and won't be opted out of any more business units.
- You can only use one default subscription preference page for all business units, and it can't be customized.
- Contacts who opted out of receiving emails from a business unit can resubscribe through a form, as long as you've associated the form with a business unit.
To manage the subscription types associated with your business units:
- In your HubSpot account, click the settings icon in the top navigation bar.
- In the left sidebar menu, click Marketing > Email.
- Click the Subscription types tab.
- To filter your subscription types by business unit, click the Current view dropdown menu, then select a business unit.
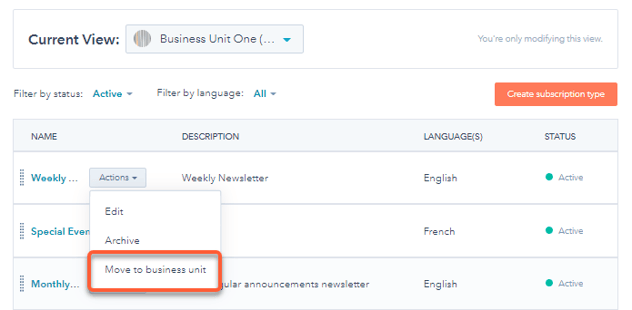
- To associate a subscription type with a different business unit:
- Hover over the subscription type you want to update, then click the Actions dropdown menu.
- Select Move to business unit.
-
- In the dialog box, select a new business unit, then click Move.
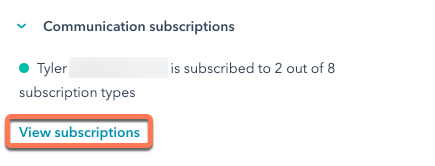
- To view a breakdown of a contact's subscription types by business unit:
- Navigate to the contact's record.
- Under the Communication subscriptions section, click View subscriptions.
-
- Click the Business Unit
Workflows
Users with Marketing Hub Enterprise subscriptions who have purchased the Business Units Add-On can assign workflows with business units.
By default, workflows aren't assigned to a business unit. A workflow doesn't have to have a business unit assigned. But, business units are useful for organizing your workflows by individual brand.
- In your HubSpot account, navigate to Automations > Workflows.
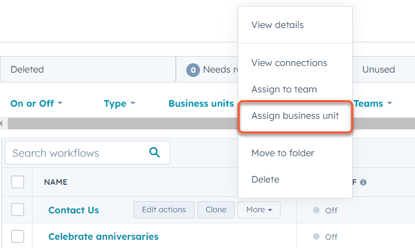
- To assign an individual workflow to a specific business unit:
- Hover over the name of the workflow and click More. Then, select Assign business unit.
- If the workflow already has a business unit assigned, hover the name of the workflow and click More, then select Change business unit.
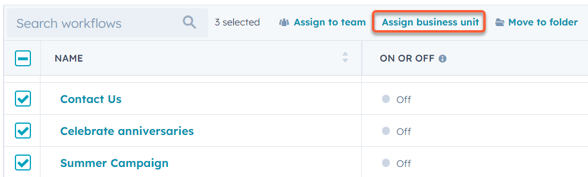
- To assign multiple workflows in bulk:
- In the workflows table, select the checkboxes next to the workflows that you want to assign to the same business unit.
- At the top, click Assign business unit. If the workflow has an existing business unit, it'll be reassigned to the new selected business unit.
- In the dialog box, click the Business units dropdown menu and select a business unit. Only one business unit can be assigned to a workflow.
- At the bottom, click Save.
Zoom integration
Currently, Zoom is the only integration supported for business units. If you have a unique Zoom account for each business unit, you can connect each account to the corresponding business unit. Before connecting a Zoom account to your business unit, install the Zoom integration on your HubSpot account.
To associate your Zoom account with a business unit:
- In your HubSpot account, click the settings icon in the top navigation bar.
- In the left sidebar menu, navigate to Business Units.
- Select See connected apps.
- If you haven't already, install the Zoom app from the App Marketplace.
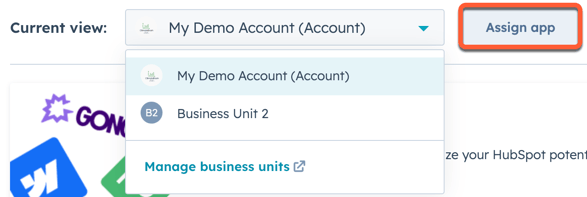
- Once installed, click the Current view dropdown menu and select the business unit.
- Click Assign app.
- Click the Choose an app dropdown menu and select Zoom.
- Click the Choose a Zoom account dropdown menu and select your connected Zoom account.
- Click Confirm and connect. When new contacts register for or attend a Zoom webinar or attend a Zoom meeting, they will automatically be associated with the corresponding business unit for that Zoom account
Please note: the Add Contact to Zoom Webinar workflow action will only work for the Zoom account connected to the primary Account business unit. Using the action to add contacts to a Zoom webinar not associated with the primary Account business unit will result in the contact not being registered for the webinar.
